

Reference
 Links
Close
Links
Close
Curved screen printer adjustment tutorial-【Part 2】
| Filename | Curved screen printer adjustment tutorial-Part 2.pdf |
| File Size | 231.7KB |
| Revision Date | 2023/03/22 |
Curved screen printer tutorial video Part 2
FA-400 RSN semi-auto curved screen printer tutorial video Part 2

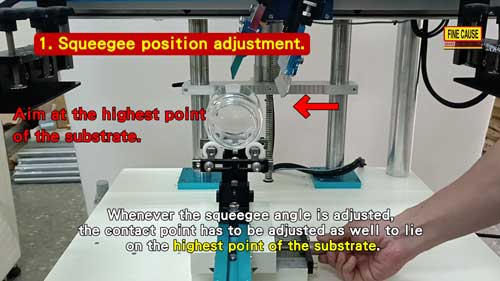
1.Squeegee position adjustment.
-
Remove the screen stencil. Adjust the height of squeegee stand so the squeegee can be fixed properly.
-
Adjust the angel of the squeegee.
-
When the diameter tolerence of the substrate is wider, we could set a greater angle to the squeegee to aim at the highest point of the substrate.
-
※Whenever the squeegee angle is adjusted, the contact point has to be adjusted as well to lie on the highest point of the substrate.
-
Make sure the contact point is right at the substrate's highest point; otherwise, problems like shadow effect and ink overflow will easily occur.
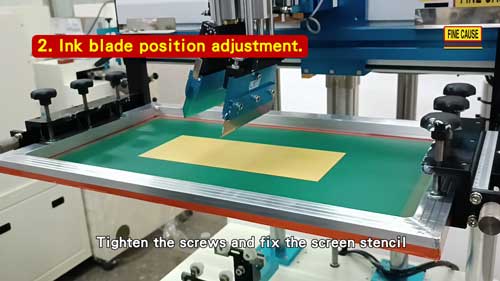
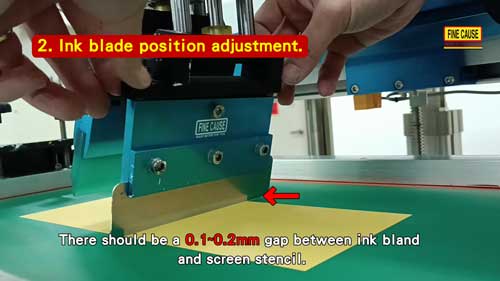
2. Ink blade position adjustment.
-
Take out the substrate and put the ink blade on. Set an approximate height and level in the down position. Be sure the down position is at least 5mm higher than the screen stencil. 【For more precise position】Make subtle adjustment when the screen stencil is installed.
-
Have the squeegee stand in the up position and install the screen stencil. Adjust the left and right position of the screen stencil. Make sure the image is at the correct place of the substrate. Tighten the screws and fix the screen stencil
-
Make subtle adjustment on the level and height. There should be a 0.1~0.2mm gap between ink bland and screen stencil. Ink blade should not be in contact with screen stencil.
Please download the file if you need the complete content, please click the Download button to download.
.................................................
To be continued Part-3
-How do we adjust ink scraping area
-Printing